Veuillez ne pas bloquer les publicités sur notre site. Les clics sur les annonces nous aident à exister, à nous développer et à devenir plus utiles pour vous !
Installation du régulateur de différence de pression
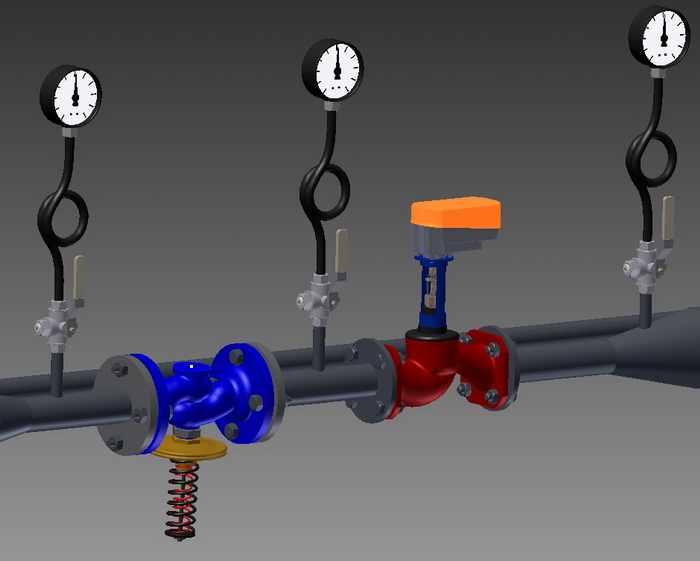
Installation du régulateur de différence de pression doit être effectuée conformément aux instructions de montage, en tenant compte des recommandations suivantes :
- Des manomètres doivent être installés avant et après le régulateur.
- Un filtre en Y doit être installé avant le régulateur de différence, dans le sens de l'écoulement de l'eau.
- Pour l'installation sur une canalisation transportant de l'eau à haute température, un refroidisseur d'impulsions et un refroidisseur de tige peuvent être nécessaires.
- Les fabricants donnent diverses recommandations, mais en général, il est conseillé de prévoir des sections droites de 5DN avant et 10DN après le régulateur lors de l'installation.
- Pour la plupart des régulateurs de différence de pression, la position d'installation recommandée à des températures supérieures à 80°C est horizontale avec l'actionneur à membrane vers le bas ; à des températures inférieures à 80°C, l'installation peut être dans n'importe quelle position.
Séquence de calfeutrage de la connexion filetée
1. Prenez un faisceau de fibres de lin d'une épaisseur suffisante pour que son diamètre tordu corresponde approximativement à la profondeur du filetage. La longueur doit permettre un enroulement 1,5 à 2 fois plus important que le nombre de tours de filetage.
2. Commencez à environ 50-70 mm de l'extrémité, tournez légèrement le faisceau, placez-le dans le premier tour du filetage, maintenez-le fermement et enroulez-le dans le sens des aiguilles d'une montre, en le plaçant dans chaque tour de filetage.
3. Atteignez la fin du filetage, continuez à enrouler en revenant vers le début du filetage, en couvrant environ 2/3 de la longueur du filetage avec une deuxième couche.
4. Enroulez l'extrémité restante du faisceau (50-70 mm) dans le sens des aiguilles d'une montre, de la fin du filetage vers son début.
5. Appliquez une couche de mastic sur la surface du calfeutrage.
6. Serrez les éléments de connexion à la main. Avec un calfeutrage correct, l'élément doit être serré de 1,5 à 2 tours.
7. Utilisez une clé ou une clé dynamométrique pour continuer à serrer. Si l'élément doit être dans une position spécifique, terminez le serrage dans la position souhaitée.
Avec un calfeutrage correct, le couple de serrage ne doit pas dépasser les valeurs suivantes :
| DN15 | DN20 | DN25 | DN32 | DN40 | DN50 | DN65 | DN80 | DN100 |
|---|---|---|---|---|---|---|---|---|
| 70 Nm | 95 Nm | 120 Nm | 150 Nm | 190 Nm | 230 Nm | 280 Nm | 350 Nm | 400 Nm |
Couples de serrage des écrous pour les raccordements à bride
| DN | Écrou/Boulon | Couple, Nm |
|---|---|---|
| 15 - 32 | M 10 | 15 - 30 |
| 40 - 65 | M 12 | 35 - 50 |
| 80 - 100 | M 16 | 75 - 100 |
| 125 - 150 | M 16 | 80 - 120 |
| 200 | M 20 | 150 - 200 |
| 250 - 400 | M 24 | 340 - 410 |
| 500 | M 27 | 340 - 410 |


 Tutorial Danfoss
question : commentaire : retour
213
 Catalogue de
 Régulateurs de Pression Différentielle
Danfoss
Danfoss
Danfoss
Danfoss
Danfoss
Danfoss
Herz
Herz
LDM
LDM
LDM
IMI Hydronic
IMI Hydronic
IMI Hydronic
IMI Hydronic
Oventrop
Oventrop
Clorius
Clorius
Samson
Samson
Samson
Samson
КПСР Групп
IMI Hydronic
IMI Hydronic
Broen
Broen
Samson
Samson

